Friday 7 November 2014

Orange cake

  Mister Chief is four now.  Far too grown up for my liking.  We had a conversation the other day about growing up.  He informed me that he was going to grow bigger and.

  That's how he said it, 

  "I'm going to grow bigger and".

  "And?" I said.  I expected him to say taller, or stronger, or something.

  "And bigger"  said he.

  "And?" I said.


  "And bigger"  said he.

  "And?" I said.


  "And bigger"  said he.

  "And?" I said.

  "And POP!!" he said happily.

  Still small and gorgeous then.  :-)


  A birthday party necessitates an extra special cake - but one that is pretty foolproof.  I made this cake for the first time and it worked out brilliantly.


Ingredients
1 thin-skinned orange (except I didn't have any oranges so I used three small "easy-peelers" instead, not sure if they were satsumas or clementines but they didn't have any pips)
275g self-raising flour
2 tsp baking powder
275g caster sugar (except I used normal granulated sugar 'cos that's what I've got)
275g butter/marge
4 eggs (I used 5 because three of them were small, one of our chickens has only just started laying)
1 tsp ground cinnamon
1 tsp ground mixed spice (or nutmeg or something you like if you don't have mixed spice)


What to do

Preheat the oven to 180C/350F/Gas 4 (fan 160C).
Grease and line an 8in sandwich tin (or whatever cake tin you want to use) with non-stick baking paper. 

Place the whole orange (or satsumas) in a small saucepan, cover with boiling water and boil for 30 minutes, or until soft. Leave to cool. When the orange is cold, cut in half and remove any pips.  I actually didn't leave them to cool but held them carefully and cut them as quickly as possible to try not to burn my fingers.
Roughly chop the orange and blend, including the skin, in a food processor.
Cream together the sugar and butter, then add the eggs and mix well.  Add the blended orange.
Sieve in the flour, spices and baking powder and stir until it's all really well mixed and looks smooth.  Pour the cake mix into the prepared tin and bake in the pre-heated oven for about 30-40 minutes. 
Leave to cool for a couple of minutes and then transfer the cake to a wire rack to cool down properly, peel off the baking paper when it's cool enough to handle.


Then, when it's cooled, it's time to decorate!  I let Mister Chief go crazy with some pre-shaped icing decorations in the shape of vehicles.  I was probably fooling myself to think that there would be any left - of course he used both packets.  Why wouldn't he?  I also melted some chocolate and poured it into little heart moulds, so the cake was well and truly decorated!

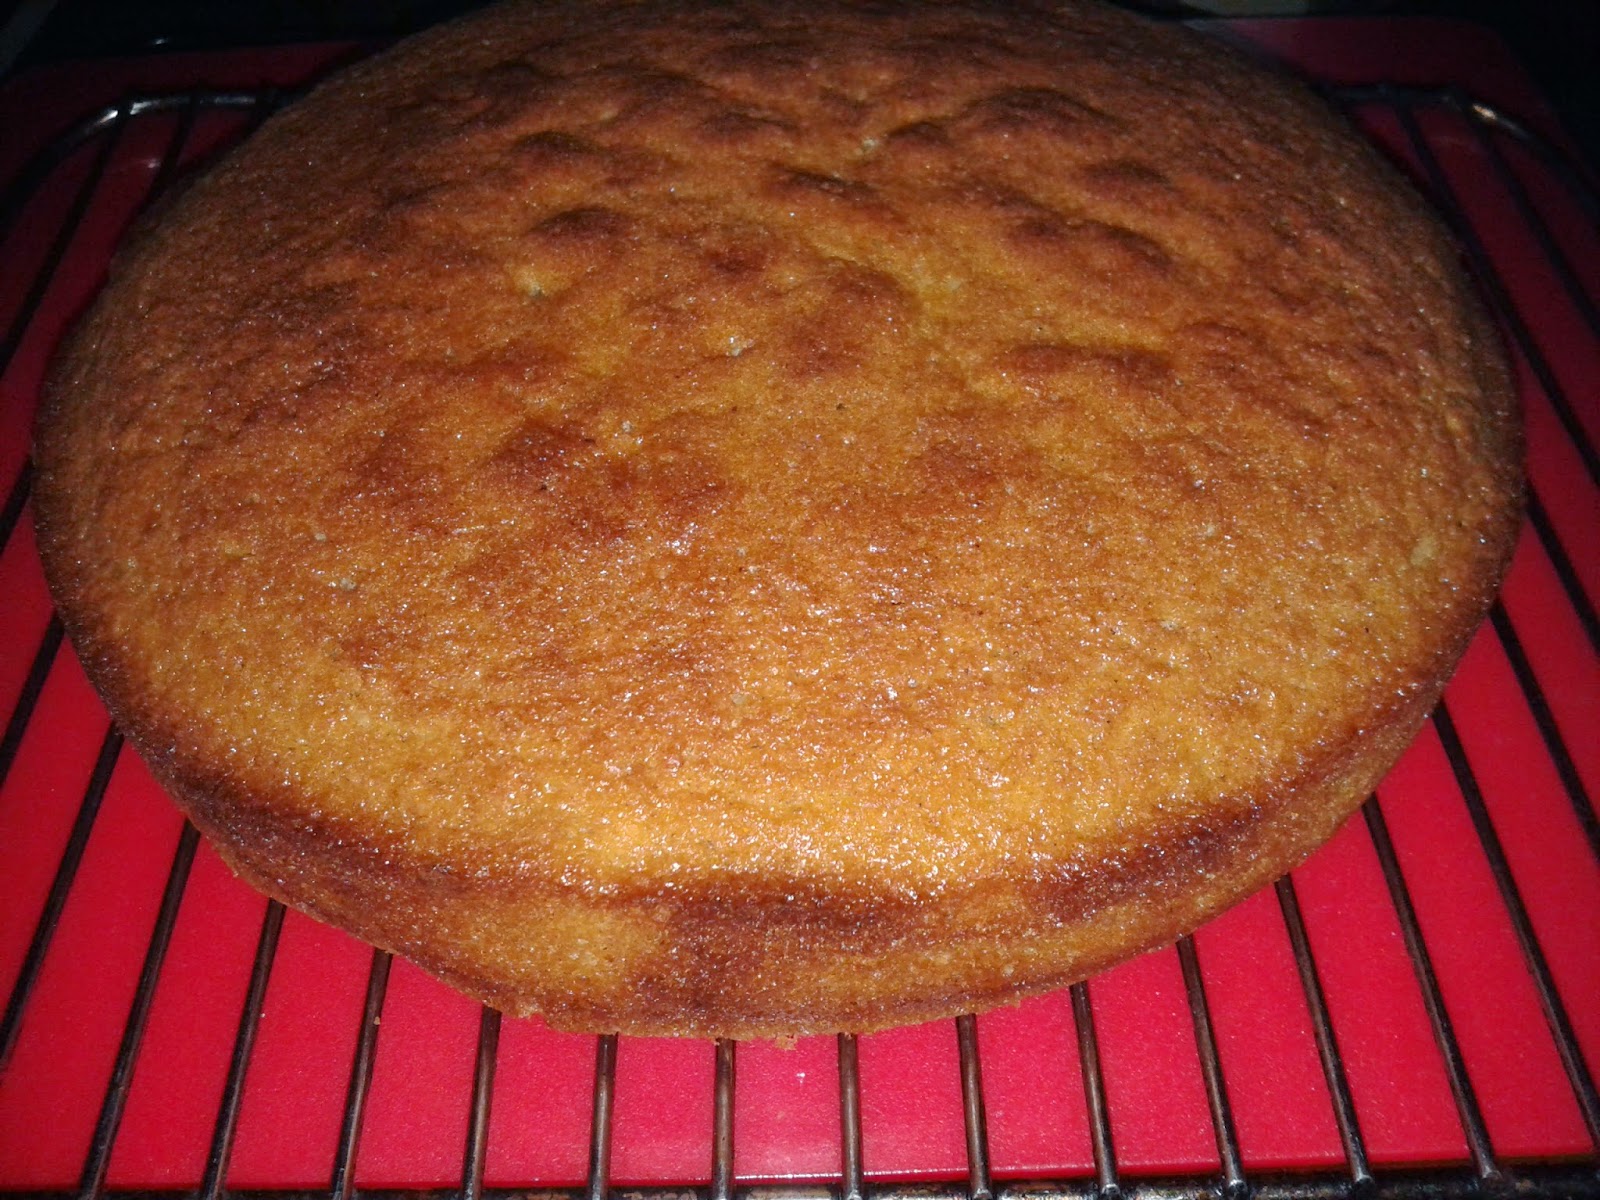
I forgot to get a picture of the finished cake before it was cut, but managed to snap this pic before it was all scoffed.


  And it was really yummy!  I'm planning to make another cake like this for Christmas except maybe using more spices.  I'm not going to use raisins, currents or sultanas though - they are evil ex-fruit.


Tuesday 28 October 2014

Cauliflower cheese

It's half term soon and I'm making plans for keeping everyone sane.  The usual venues tend to be ridiculously crowded (which, quite personally, is filling me with dread for next year when Master Chief will be at school and the only time we can go to Sealife, soft play, etc will be the busy times) and also we're pretty skint.  It's the end of October so trips to the park are possible but not for as long as in the summer.  Wet woods walks are always a winner, followed by a bath and hot chocolate.  Mmmm.  Lovely idea.  The reality is sharing a bath with two wriggly splashing toddlers and either necking the hot chocolate so quickly it burns my mouth or finding it cold an hour later!

The colder, darker days are also luring me to comfort food.  So I remembered an old family favourite that I haven't made for months.  Cauliflower cheese, easy to make, a hit with the kids, hurrah for that then.


Ingredients
1 large cauliflower
500ml milk
4 tbsp flour
50g butter
100g cheddar, grated


What to do
Heat the oven to 220C / Gas Mark 7.
Take the cauliflower leaves off and break the white bits into pieces.
Get a large saucepan, half fill it with water and heat it on the hob until it's boiling.  Put the cauliflower in and boil it for about 5 minutes.  Drain the cauliflower and then put it in a large ovenproof dish or tray.
Put the milk, flour and butter in the empty saucepan and whisk while heating until it's really well mixed and is bubbling nicely.  Turn of the heat and stir in most of the cheese (leave a small handful for sprinkling over the top).
Pour the cheese sauce over the cauliflower and scatter a bit of cheese on top.


Then stick the dish in the oven for about 20 minutes.  When it looks done take it out and sprinkle the rest of the cheese over the top, it'll melt on and give a really cheesy smell and taste.


Eat.  I'd recommend waiting until it cools a bit but I often burn my mouth because I don't wait so who am I to preach?  You'd think I'd learn.


Saturday 18 October 2014

Really easy bolognese

So, I used to write about stuff here, in this blog.  Then, the summer holidays hit us and I found I was overtaken in a world of holiday activities, trying to keep sane, soothing a teething toddler (those ghastly molars!) and dealing with loads of other stuff.  We lost a family friend, she was taken from us by cancer.  It hit us hard.  Maybe I'll write about that some other time.
I have also been involved a lot in a local funding bid to bring a lot of money into the area for pregnancy and the early years, really exciting stuff, so that's involved time and effort.
Excuses, excuses.  I'm back now and hoping to get going again.
So, teething.  How unfair is teething?  Lots of pain, lots of tears and sleepless nights.  I'm still breastfeeding and that seems to be the only thing that comforts Miss Chief.  I am trying to eat healthy and lose some weight but I need to focus more on cooking and not just groaning "Let's get a takeaway" as we sink into the couch after the ninth trip upstairs.
I've been using the slow cooker a lot more, both Master and Miss Chief seem to accept these meals as edible.  I don't like mince but I've been making some meals for the rest of the family and they are going down well.  Here's a  very simple bolognese recipe that can be made quite quickly and was yummed up.  This would feed four adults or make a lot of portions for small people. 


The pirate plate is optional.  This is Mr Chief's portion because he's trying to stay off carbs but I made pasta to go with it as well.


Ingredients
Mince, any type (I used a 500g pack minced beef but turkey or lamb will do just as well)
Peppers, chopped (I used a yellow pepper because that's what I had in the fridge)
Onions, chopped (I used 2 red onions)
Mushrooms, chopped (I used 3 large ones)
1 tin of chopped tomatoes
Mixed herbs
Oil

What to do
Heat the oil in a wok or large frying pan.  Bung in the mince and stir it round, breaking it up, until it's all browned, then add the peppers, onions and mushrooms.  Stir round for a bit until they seem a bit softer and then pour in the tomatoes.  Stir until everything is really well mixed and then sprinkle on some mixed herbs and stir them in.
That's it really.  Just leave it bubbling gently away for a while, stirring it occasionally .  A while can be ten minutes while you make tomorrow's lunches or half an hour/an hour while you persuade the children that sleep really IS an option.  As long as it's on a low, gentle heat then it should be fine.
Alternatively, you can fry up the mince and veggies and then chuck them in the slow cooker with the tomatoes and herbs and leave it to do it's stuff.
Cook some pasta and then serve it all up with an enormous glass of wine.  Or water, whatever's your poison.


Tuesday 5 August 2014

Fudge

Day one of the holidays (well, nearly, they've got a nursery party tomorrow so it's my last day at work until September) and we made cakes and fudge!
Mr Chief decided a few days ago to buy some scones, some strawberry jam and some clotted cream.  There's been clotted cream sitting in my fridge for a couple of days (all the scones have been scoffed) so I thought it shouldn't go to waste.  Clotted cream fudge - yes please!

Ingredients
275g  sugar (I used normal granualted because that's what I've got, the recipe said to use unrefined blah blah blah)
100g golden syrup (this I always have, don't you just love that it's still in a funky tin like our Grandmother's used to use?  The squeezy stuff just isn't the same)
227g clotted cream
½ tsp vanilla essence

What to do
Get a square tin (or one of those microwave meals plastic tubs, which is what I used) and grease it then line it with greaseproof paper.
Bung all the ingredients into a  saucepan and heat gently, stirring until it's all blended. Bring it to the boil, cover the pan and boil it for about 3 minutes. Uncover it and continue to boil for a while ( the recipe said to boil it until the temperature reaches 116 °C / 240 °F - I did it for around 5 minutes - about the length of time it took to get both kids a drink and supervise a toilet trip for Master Chief).
If you don't have a thermometer (and who does?) you can see if the fudge is ready by dropping a little into a cup of cold water. If it turns into a soft ball, it's ready.Remove the pan from the heat and beat the mixture until it becomes thick, this could take up to 10 minutes. Pour into the prepared tin/tub and leave for 30 minutes. Mark into squares with a knife and leave until set. I always do this too soon and the knife drags though the not-yet-set fudge, try and wait until it's cool and it'll cut a lot neater!
Cut it into the pieces that you marked and store in an airtight container.

I would have put a picture here - but it's all been eaten!  I'm going to make some more though, so I'll update when I can get in quick enough to snap a picture.

Wednesday 23 July 2014

Sharing party

Sometimes when you just can't think of anything to cook, or it's too hot to eat a"proper" tea or your brain has been turned into a small heap of mush because you've been at home with the kids all day and you know the beebies timetable like your own name - so just occasionally then ;-) - I do a sharing party for the kids.  Master Chief loves it, Miss Chief likes it because he does.
It involves a pound shop divided plate and various bits - grapes, blueberries, satsuma, apple, mini chedders, raisins, or whatever you have really.  It's a great way to get some fruit into them as they have the choice (and usually end up eating more than they would if I just put it in front of them), in fact sometimes Master Chief wants a sharing party just for himself - kind of missing the point there but hey, it's still getting him to eat.


You can just put a little bit in and keep refilling if you want, then there's no waste.
I've got some recipes for fruit gummy sweets that you make yourself which I'm going to try at some point but in the meantime this works a treat - they're happy because they have the controlled choice that we all love and I'm happy because it's quick, easy and healthy (well, as healthy as you want to make it, I suppose you could fill up the plate with chocolate if you wanted!)
One small tip though - if you have a destructor tot like Miss Chief then DON'T let them smash the empty plate down on the table.  Bits break off.  That'll be a trip into town for me then...


Wednesday 16 July 2014

Pancakes!


We made pancakes!  Well, Master Chief helped me mix the batter and I did the cooking but it all counts.
We had them for breakfast and they were yummed up by the whole family.  The recipe below makes about 6 pancakes but that obviously depends how big you make them.  I doubled the amount and then we had some cold - absolutely delicious spread with butter!


Ingredients
50g sugar (the recipe said caster but I only had granulated)
100g flour (the recipe said you can use either plain or self-raising - I used self-raising)
1 egg
Milk - just a little bit

What to do
Sieve the flour into a bowl and add the sugar.
Add the egg and mix it all up using a whisk (or a fork if you don't have a whisk!).  It'll be a lumpy, dry, floury mixture.
Add the milk, a little bit at a time - mixing and adding, mixing and adding until it's a smooth thick batter, like cream or melted ice cream.  You shouldn't need a lot of milk, I think I used less than a teacupful.
Oil or grease a frying pan, when the pan is hot pour or ladle in a bit of batter.  You can use as much or as little as you like, the pancakes can be any size but if you make them too big then it gets really difficult to turn them over.  The recipe said cook for about a minute on each side but I think this depends on your cooker.  I used a plastic ladle to ease the edges up until it was loose and then flipped it (I'm a flipper, some people just turn it with a spatula - where's the fun in that!). 
When the pancake was done I put it on a baking tray in a warm oven - this is so I could cook all the pancakes and then we could all eat them together, rather than me standing there at the stove while Mr, Master & Miss Chief devoured them!
You'll probably need to re-grease or oil the pan between pancakes.

I find that my first pancake is usually pretty crappy, either over or under done so maybe you eat that while you're cooking the rest.... chef's perks, right?

Eat with sugar & lemon, or golden syrup (we didn't have maple), or chocolate spread, or jam, or anything really.

Fairly quick and easy breakfast or dessert - don't wait for pancake day!


Friday 11 July 2014

Eggshell art

We have chickens, did I mention that?  Lots of lovely fresh eggs, yum.  Lots of eggshells.  Not a problem for us, we seem to live in one of the few areas where the food recycling bins are emptied regularly, also there are uses for eggshells, putting them round your plants to stop the snails and slugs, using them to grow seedlings in (as you can put them straight into the ground) or - eggshell art!
I saw this on a children's television program and stored it away in the dim and distant recesses of my memory where it was only dredged out recently when Master Chief wanted to make cards.

What you'll need
Eggshells (You'll need way more eggshells than you think)
Normal food dye in whatever colours you want to use (or have)
A bowl for each colour you're using (I used china bowls, I think plastic ones would take on the colouring)
Teaspoons (I used one for each colour but you could use and wash and then use for the next colour)
PVA glue
Card

What to do
Before you want to use the eggshells you'll have to clean them.  I rinsed them in water and then put them in a bowl of water to soak, this cleaned them and also made it easier to peel the inner lining off the shell.  You need to leave them to dry after this so do this the day before, or in the morning for use in the afternoon.
When they are dry, crush the shells using the back of the teaspoon (you want them small but not crushed into powder).  
Put the shells into the bowls and mix in the colouring.  Mix it in well, you want the eggshells to take on the colour thoroughly.
Leave the shells to dry, this shouldn't take long depending on how much dye you used (I spread the shells out on some kitchen towel to dry quicker)


The dye will seep through the kitchen towel so don't put them on anything that could stain.
When they're dry you can start making your card!
Depending on how artistic you are you might want to do this freehand or you might want to draw a design on the card to follow.
Glue the area of the card you want to put the eggshells on and then spread a thin layer of the eggshells on.  Drizzle some more glue over the top so it sticks really well.  If it doesn't look enough then put some more shells and more glue on until you're happy with it.
We did a pirate ship design as Master Chief is a pirate fan (who isn't?) and we added glitter to the blue "sea" for added effect (and because glitter is fab).


We added a little pirate that was cut out of a party cup and a little pirate flag and hey presto!  A lovely pirate card.


I was going to tidy it up a bit but Master Chief wanted it just as it was and he's the artist so we left it.  The recipient was very impressed!


Thursday 10 July 2014

Blue Monday

Today, as we were driving home, Master Chief made a request. Normally it's "Can I listen to Thomas please Mummy?".  Today it was "Um, I want, um, can I listen to Blue Monday please?".
So proud.

Wednesday 2 July 2014

Swordfish!

I found a great little fish shop in Southend.  It's W&G Gilson in Burdett Road, Southend-On-Sea and I bought swordfish from them.  They also sell fresh fish that they catch themselves locally which is great for those who are food miles concious.
I like swordfish, I've eaten it a few times in restaurants but never bought it or cooked it.  So I fell back on good old Google for instructions.  And then, of course me being me, I took the idea and went my own way.  Mr Chief thought it was Christmas, he liked it so much!
I made my garlic potatoes to go with it (I'll tell you about those next time) and washed it down with a nice bottle of Montepulciano (yeah, I know, it's supposed to be white wine with fish, but it's a meaty fish okay?) 


Ingredients
Swordfish (I used 1 steak each)
Garlic, roughly chopped (I used 3 large cloves, but then I love garlic, you might want to use a couple)
Olive oil (it said to use extra virgin, luckily that's what I have, but I would've used normal)
The recipe also called for lemon juice (I had a Jif lemon in the fridge, lucky there, but I think a purest would've shot me)
Salt
I also added some Worcester Sauce to the dish because I love it!  It made the swordfish a bit darker than it would've otherwise been but added a lovely spicy, tangyness.

What to do
Preheat the oven to 180
Pour a bit of oil into an oven proof dish.  Add the Worcester Sauce (if you're using it). 
Put the chopped garlic in the dish with a sprinkle of salt.
Put the swordfish steaks in the dish and move them around, then turn them over so they're nicely coated.  
Put them in the oven at 200°C/Gas Mark 6 for about 15 minutes.  Then add the lemon juice and chopped parsley (if you've got it!) and bake for another 5 minutes.

Yum!


Wednesday 25 June 2014

Slow cooker saves the day

I love my slow cooker.  I really do.  I know it's probably a bit granny-ish but I find it so convenient to chuck a load of stuff in and then when I come home from work there's dinner!  That's pretty much how I use it, I don't do anything fancy, I rarely brown meat before I bung it in or anything technical like that.

Usually, I chop up some chicken or beef, a load of vegetables and then lob it all into the slow cooker with a tin of tomatoes and it cooks up a treat.  Sometimes I add some herbs or spices.  That's it really.  I used to be concerned about how to use it, if I should follow a recipe or anything like that, but then I just started to use it and realised - it's so easy!

This week, I did a joint of beef in it.  No cutting up of the meat, I literally just put it in.  I chopped up some potatoes and onions and put them on the bottom, put a little water in and then balanced the beef on top and sprinkled it with paprika.  When I got home from work, I sliced the beef and served it up with the potatoes, onions and the juice from the cooker - and it was gorgeous!


Even better, both Miss Chief and Master Chief gave it the seal of approval - and a toddler seal of approval is hard won.

Obviously you have to be a little bit prepared i.e. have the food ready in the morning to put in, but my new slow cooker (a Prolex) even has a setting where you can put frozen stuff in it and it cooks it on a high temperature and then switches to the actual slow cooking - genius!

My advice is - if you have a slow cooker, don't be frightened, just use it.  You'll get better if the first time isn't fantastic, and you can always blend whatever you've cooked and make it into a soup.  If you don't have a slow cooker - buy one!

Monday 16 June 2014

Baking cakes with silicone moulds

We made cakes for Father's Day.  Master Chief loves to help out in the kitchen and especially loves baking cakes so when we saw some silicone cake moulds for sale we snapped them up.  Train shapes, butterflies and beetles, little houses and dinosaurs - just what everyone needs.
We've made the train ones before, obviously with Master Chief being Thomas The Tank Engine crazy, this time we decided on the houses and insects.  The results were impressive, I didn't expect them to look so good shapewise.  Well, the insects looked good, I think the houses could've looked better.   We used a basic sponge recipe for the insects and an eggless cake with chocolate pieces for the houses.


The most important thing with silicone moulds is to ensure that the cake doesn't stick, and here's the best way I've found to ensure that doesn't happen - I've had cakes turn out as shapeless blobs.  They're tasty but not quite the image you're going for!

Make sure the silicone mould is absolutely clean and dry. Oil the moulds thoroughly - I used spray-on oil, I found it easier to cover all the little bits of the mould properly.  Instead of putting the floppy mould on a baking tray (this can affect the cooking) I used an oven shelf and slid the moulds in and out of the oven on that.
After it's cooked leave the cake to go completely cold, inside the mould. This is the most important thing.  When it's cooked the cake will be firmer and you'll be able to turn it out easily.
That's it really, I've out the two recipes below, the eggless one is so useful for when you haven't planned to bake cakes or have just used the last egg for breakfast.

Basic sponge
Ingredients
Butter - 125g (4oz)
Sugar - 125g (4oz)
2 eggs
Self raising flour - 125g (4oz)

What to do
Heat the oven to 180 (C) / 350 (F) / gas mark 4
Cream the butter and sugar together.Beat in the eggs.
Sieve in the flour and mix in (it says to use a metal spoon but if you haven't got a suitably large one then use what you've got!).
The mixture should be a gooey, kind of yoghurty consistency, so you can dollop it into the moulds.  Bake for about 20-25 minutes or until it looks good.  If you want to get technical then stick a skewer in and if it comes out clean then it's done.  I kind of go by the visual and sometimes I poke it a bit to see if it's still gloopy!

Eggless sponge
Ingredients
Plain flour - 175g (6oz)
Baking powder - 3 tsp
Butter - 70g (2.5oz)
Sugar - 60g (2.25oz)
Golden syrup - 1 tbsp
Milk - 150ml (1/4 pint)

What to do
Heat the oven to 190 (C) / 375 (F) / gas mark 5
Sift the flour and baking powder into a bowl.
Cream the butter, sugar and golden syrup in a separate bowl until light and fluffy.
Add a little flour/baking powder and then a little milk and mix.  Repeat this until it's all mixed together.
Dollop it into the moulds and bake for about 20-25 minutes or until they're done (or what you think is done - see above for my version!)

Don't forget to leave them to go completely cool before you turn them out of the moulds.


Thursday 12 June 2014

Pier walk and pesto salmon pasta

We live in Southend.  We probably don't make the most of it but this weekend we decided to walk the pier.  We've done it before but not for a while and it was a lovely sunny day so we went for it.  After a fortifying breakfast at a local cafe we set off to walk one way and train it back.  Master Chief loves trains, absolutely adores them so we knew that would make him happy.  Miss Chief was safe in her buggy, not only is she a mountaineer (which is worrying on dry land let alone a pier) but she wouldn't be up to the mile and a bit walk.  We had a lovely walk, waving at the train every time it went by and generally being happy in the sunshine.


When we got to the end we found out that there was an open day at the lifeboat centre.  Master Chief had a fantastic time sitting in the lifeboats and "driving" them.  Then there was the fun of the train ride home, which they both loved.

After a long and busy day, I didn't feel like creating magic in the kitchen so I decided to fall back on one of my trusted old favourites - pesto salmon pasta.  Very quick, very easy, very tasty.

Ingredients
Pasta, any type
Salmon, one fillet per person
Pesto, I used half a jar but it depends how many people it's for and how much you like pesto
Mushrooms, chopped (optional)

What to do
Cook the salmon.  The fillets I had were cook from frozen so it's an easy last minute dinner.  Cook the pasta as normal.  While it's cooking, shred the salmon into bite sized (or smaller) pieces, and chop the mushrooms if you're using them.  When the pasta is cooked, drain it and return it to the pan.  Stir in the pesto, salmon and mushrooms and then serve it up.  Voila!

You can jazz it up if you like by adding spinach, or grating cheese on top, or numerous other additions.  Enjoy!

No picture of this one I'm afraid, my battery died before I could take it, but as it's so easy I'll probably make it again soon and try to add a picture.

Wednesday 4 June 2014

Half term and toad-in-the-hole

It's half term.

That means no childcare.
It also means no work for me as I'm now on a term-time contract.

So, less expense on childcare, which is good.
It's been raining all week, which is bad.

All the garden/park/woods fun I had planned?  Not so much.  Don't get me wrong, I love a muddy, puddly, splashy walk as much as the next Mum, but after four days of it it starts to lose it's appeal.  I don't want to go to soft play, it's mental in the holidays.  My two are still small enough that lots of boisterous kids can be intimidating (more so for Master Chief than for Miss Chief, she's a bit of a bruiser!).  

So, crafty bits inside are a winner at the moment.  Master Chief loves getting out his maker box, and Miss Chief seems content building towers for longer these days so it's working.  Last week it wouldn't have worked, she'd have tried to snatch away whatever he was working on and he'd have the screaming abdabs. Next week it might not work, but for the time being I'm making the most of it.  We've made cards for every event, and pictures for everyone.


We've made a gingerbread house (yes, I know it's been a while since Christmas but we never got around to making it then).


 We also made toad-in-the-hole, Master Chief loved mixing the batter and everyone loves sausages.  

Ingredients
Sausages (as many as you want)
225g Plain flour
4 eggs
250ml milk
Oil

What to do
I prefer my sausages well cooked so I always brown them first, either in the oven or in a frying pan.  While you're doing that, put a deep baking tray into the oven with the oil in it so it gets really hot.
Mix together the flour, eggs and milk (adding the milk in gradually) and whisk until it's smooth.  Put the sausages into the oven tray (into the hot oil) and then pour the batter all over them (I always make sure that the sausages stay away from the edges of the baking tray).  Put it in the oven at about 200 degrees (gas mark 6) for about 30-40 minutes - basically, as the sausages had a head start, when it looks done, it's done!


I served it with gravy and some veg on the side, this time it was cabbage and cauliflower.
Cue happy faces and clean plates.

What've you done with your holidays?

Wednesday 28 May 2014

Hens & wraps

We have hens!  
It's something we've been talking about for ages, Mr Chief is the kind of guy who wants to research everything thoroughly before committing and so we've been visiting chicken farms, looking at coops and runs, discussing how many, where to keep them, etc for the last year.  We went for another visit (after Master Chief and I drew a fantastic chicken run picture on a restaurant napkin) to our local chicken farm and I managed to persuade Mr Chief that we should bite the bullet and just get them.  So we now have two hens, a light Sussex and a Bluebell.  They're settling in nicely and then yesterday....


Hurrah!  They're small but perfectly formed, and I used them this evening to make the frittata featured in a previous post (http://chiefcookbottlewash.blogspot.co.uk/2014/05/frittata-quick-win-big-hit.html).  I made it for the kids but obviously had to try some - delicious!

In other news, as it's half term (more about that later) I have zero energy after the kids have gone to bed.  If I haven't used my trusty slow cooker or managed to throw something together during the day then it has to be minimal effort dinner for me and Mr Chief.  Tonight's offering was Cajun prawn salad wraps, and they turned out pretty good.  


Ingredients
Prawns
Olive oil
Cajun spice
Lettuce
Red pepper
Spring onion
Cucumber
Mayonnaise
Wraps

What to do
Chop up the lettuce, peppers, spring onion and cucumber into small pieces and mix together in a large bowl.
Fry the prawns in the olive oil and the Cajun spice for a few minutes.
Spread a little mayo on a wrap, spread some salad mix onto it and then some prawns and fold up - voila!

The picture above looks veg heavy and prawn light but there were a lot more prawns deeper down.


Obviously, you can substitute any of the salad veggies for one you like better/hate less.  I also make these with Cajun chicken, or I use other spices instead.  It's quick, filling and healthy, the perfect quick dinner when all you want to do is curl up with a glass of wine!


Wednesday 21 May 2014

Frittata, the quick win big hit!

Sometimes, when I've had a bad night, followed by a bad day, I feel like I just can't be bothered to cook something for dinner.  Especially if it's likely to fail the toddler scrutiny test.
Then, the other day, I threw some eggs and things together in a pan - and it was a huge hit!
It even contains vegetables.  It's healthy, super fast to cook, and very easy - this is really important for those "I can't think" days when all you really want to do is bung some turkey dinosaurs in the oven and go and lie down.

I made frittata.  Wasn't sure that was the right name for it at the time but yup, it is.

Both my three and a half year old and my one and a half year old yummed it up, I've cooked it twice since then (with different vegetables to mix things up a bit) and they've gobbled up the lot each time.  It's definitely going on the list of quick and easy dinners - Mr Chief even said he'd like me to make some for him so there's an added bonus.

Ingredients
Eggs (I used three eggs between two kids)
Vegetables (I used courgette the first time, then peppers and mushrooms)
Ham (optional, but Master Chief loves it)
Soft cheese (I used the type with onions & garlic)
Oil

What to do
Chop up the vegetables, I cut them really small as I wanted them to mix in nicely, then fry them in a bit of oil.
Add a nice dollop of soft cheese to the pan and stir it up so it's all nicely mixed.
Crack the eggs into a bowl and stir well so the yolks and whites are all combined and then add the ham and the fried vegetables.
Pour it all back into the pan and cook until it's firm, loosening the edges and underneath so it doesn't stick.  Flip it over (like a pancake if you're daring, but make sure it's definitely firm - flying hot liquid egg is no fun!) and cook for a few more minutes. 
Dish it up!

Cue happy faces and clean plates - hopefully.


You could use up leftovers too, Sunday roast leavings, dinner leftovers from the night before, whatever you like.  Cut it all up really small and mix it up.

Monday 19 May 2014

Jellyyogs (or, I have some plums that aren't going to last!)

We eat a lot of fruit in our house - I mean, a LOT.  My children are fruit monsters and Mr Chief takes a fruit bowl load to work every day.  Even though I'm buying an orchard's worth each week there still are occasions when we have lurking fruit that is past it's prime.  I've already posted my banana bread recipe 
(see here - http://chiefcookbottlewash.blogspot.co.uk/2014/05/banana-bread-recipe-at-bottom-squidgy.html )
but that only takes care of the bananas.  I guess I could post about other cakes but thought I'd share a little pudding idea that's a big hit with my two darlings. 

Jellyyogs.

This time, jellyyogs with fruit.
I think I made up the title, it may have been my son.  It's basically jelly with yoghurt (or fromage frais) stirred into it, and with fruit chopped and mixed in.

Ingredients
A packet of jelly
Boiling water (as per jelly packet instructions)
Fruit, chopped (I used plums)
Fromage frais (or yoghurt) any flavour/type

What To Do
Make up the jelly as per the instructions.
When it's cooled down a bit (but hasn't started to set) stir in the fromage frais and whisk vigorously so it's thoroughly mixed.
Stir in the fruit. 
It should look something like this:


Obviously, if you use different fruit then it'll look different.  I used raspberry jelly and strawberry fromage frais for this lot.
Then decant it into little pots:
Then put it in the fridge to set.
That's it!
As it's in small pots, it sets quite quickly, which is good news for demanding little darlings.
When it's ready, it'll look something like this:


And hopefully your kids will like it as much as mine do.  Also, because it's dairy and fruit and not just jelly you can claim extra smug points.


Tuesday 13 May 2014

Wet washing & veggie lasagne

I hung my washing out today.  LOADS of it - we've just had a leak in the bathroom and used a thousand towels to mop up.  Loads of colourful towels merrily swinging from the line and then the heavens opened.  Thunder, hail, lashings of rain.  My towels are still out, they are no longer swinging merrily, they are now hanging forlornly and soddenly.  My friend  in Italy said to me once that his washing often had one machine wash and a few "natural washes" before he managed to get it in dry, I'm adopting that theory!  It'll be sunny soon, right?  I'll have dry towels again at some point.  

On the plus side, I made a gorgeous, easy and cheap veggie lasagne - and everyone liked it!  I made the sauces from scratch too so there's some extra smug points.


Ingredients

Some lasagne sheets


For the "red sauce"


Vegetables (I used aubergines, onions and peppers but in the past I've used mushrooms, courgettes, or whatever I've found in my fridge)


Two tins of chopped tomatoes


Basil


For the "white sauce"


45g butter


45g flour


300ml milk


Loads of grated cheese


What to do
  • Preheat the oven to 180 C / Gas 4.
  • Chop the veggies into whatever sized chunks you fancy and put them in a saucepan with the tinned tomatoes and basil, heat through, stirring occasionally. 
  • Melt the butter in another saucepan, stir the flour in bit by bit.  Add the milk and KEEP STIRRING!  When it looks like proper sauce thickness you can crumble in the cheese while stirring and when it's all blended then it's done.
  • In a large glass baking dish layer the red sauce, white sauce and lasagne sheets in whichever order you fancy, grate some more cheese over the top and then bung it in the oven for about half an hour or until it looks good!


Sunday 11 May 2014

Margate - baked onions and eggy bread

We went to Margate today to meet up with my cousins.  I've never been to Margate before.  It was closed.  Nearly all of it.  At least, that's what it looked like as we drove along the seafront.  The Turner gallery looked remarkably out of place against the shabbily dignified buildings looking out at the sea.  We went to the Tudor House (where all the children were interested in was the colouring in at the end) and then we went for lunch at a cafe on the pier arm (as I believe it's called).  I chose eggy bread for my two to share and I had baked onions in a gorgonzola sauce.  Yum.
Master Chief turned his nose up at the eggy bread - until it was dipped into my delicious sauce.  That's okay, I don't mind sharing.
Miss Chief (extremely apt nickname!) turned her little nose up at the eggy bread - but yummed up my baked onions.
I had eggy bread.  Luckily for me, it was delicious.
It has however, lead me to add baked onions to my "Argh, what can I do for dinner?" list.  I hadn't thought about doing them for the children before, they seemed to be the sort of thing you did for a dinner party (remember them?) but one of the major things I like about baked onions is that you don't have to peel the onions.  Minimal prep is great, especially when you have a small one who really doesn't like it if she isn't attached to you.  Of course, if you're slathering them in sauce them you'll want to peel them, but this can be done before or after cooking
I'm not sure how they actually made the sauce in the cafe but I have made it by just adding cheese to a basic white sauce.  So, here's my "hit-with-a-three-year-old-and-a-one-year-old-baked-onions-in-gorgonzola-sauce recipe.  Hope your family like it, let me know.


Ingredients
  • Onions - very vague but it depends on the size.  I use about 3-4 small (an inch or so across) onions or 1 large onion per person
  • 45g of butter
  • 45g of plain flour
  • 700ml of milk
  • 55g of gorgonzola

  • What to do
  • Make the sauce while the onions are in the oven, pour the sauce over and pop them back in for another five minutes or so.
  • Far the onions - Peel the onions and cut the tops and bottoms off, put them in a lightly oiled roasting dish and bake in the oven for about 30 - 40 minutes at about 400f/200c/gas mark 6 (this will depend on the size of the onions and the consistency you'd like).   Again, very vague, sorry but I tend to just turn the oven on and check the food until it looks and feels done.
  • For the sauce - Melt the butter in a saucepan, stir the flour in bit by bit.  Add the milk and KEEP STIRRING!  When it looks like proper sauce thickness you can crumble in the gorgonzola while stirring and when it's all blended then it's done.
The onions are lovely baked on their own, or you can season with herbs or spices, or just crumble cheese over them when they're done.  Experiment!

And Margate?  I'd go there again, it's a nice place.  Maybe I wouldn't go on a rainy, blustery (well, gale force) grey Sunday again, but on the upside we had the beach to ourselves!